These 7 mistakes to avoid at TSA airport security checkpoints can cause major problems.
 Most air travelers arrive at the airport with enough time before their flight so that a delay at TSA (Transportation Security Administration) airport security checkpoints won’t cause them to miss their flight; however, sometimes flights are missed. Here are 7 mistakes to avoid at TSA airport security.
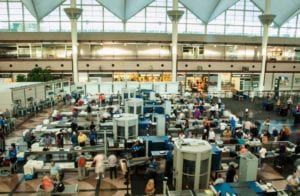
I was in Atlanta’s Hartsfield-Jackson International Airport not long ago. Fortunately, I use TSA PreCheck. The PreCheck line was about five minutes long, but the standard TSA line snaked back and forth forever. According to the TSA app on my smartphone, the standard line delay was over an hour. Any air travelers without TSA PreCheck who arrived at the airport with only an hour to spare likely missed their flight.
Here’s my list of the 7 mistakes to avoid at TSA..
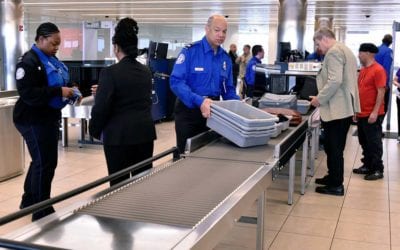
TSA PreCheck membership eases getting through U.S. airport security checkpoints quickly.
 Benefits of enrolling in TSA PreCheck:
TSA Precheck membership is highly beneficial for U.S. air travelers. Most of the time, PreCheck lines are significantly shorter and less time-consuming than standard checkpoint lines. Getting through the line is easier too. PreCheck members can keep their shoes, belts, and light jackets on. They can leave their laptop and other electronics in their carry-on, as well as their liquid baggie. While it’s true that PreCheck members may not get to use it every time, they generally get PreCheck more than 99 percent of the time. PreCheck costs $78 for new enrollments for five-year terms. Global Entry members ($120 per five-year term beginning on October 1) get PreCheck benefits in addition to Global Entry’s standard benefits.
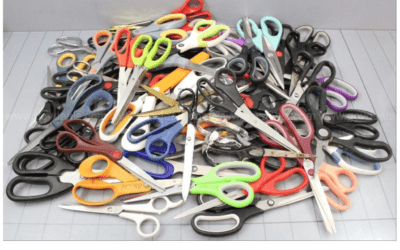
Problems faced not checking for prohibited items:
Almost every time I’m at a TSA checkpoint, I see someone getting a secondary carry-on inspection because they had a prohibited item in their bag. It might seem obvious that each air traveler should ensure that they aren’t carrying a prohibited item. Based on the number of times TSA confiscates these items, there are clearly many not adequately checking in their carry-on bags. For example, in 2023, TSA found 6,737 firearms in carry-ons at TSA airport checkpoints. Invariably, the travelers said that they didn’t realize it was in their bag.
Travelers must be sure that every item they pack in their carry-on and/or checked luggage is permitted by the TSA before they leave on their flights.
To do so, go to the TSA’s What can I bring? web page. On it, you can search for anything you’re not sure you’re allowed to pack in your carry-on. If an item isn’t listed, you can ask the TSA directly on Facebook or X at “AskTSA.”
When the TSA detects a prohibited item, they generally fully check every inch of your bag at the airport checkpoint through secondary screening and, depending on the item, may question you for a while, causing further delay. Don’t cause delays by not following these 7 mistakes to avoid at TSA.
Misunderstandings or failure to follow the 3-1-1 rule can cause significant problems for air travelers at the airport.
Not understanding and following the 3–1–1 liquids rule:
The TSA liquids rule requires each passenger to limit their liquids, gels, and aerosols to 3.4 ounces per container in carry-ons. All the containers must fit and be placed into a single quart-sized resealable bag. Regardless of whether it is in a container, the containers may not exceed how much of a license capacity is required. Larger containers are permitted in checked luggage. There are exceptions to the rule, but before you try to follow an exception, be sure of it.
 Not putting the TSA app on your smartphone:
The TSA app makes it easy to quickly use “What can I bring?” and has a link to “AskTSA.” (AskTSA on your smartphone requires that you also have either the Facebook Messenger or X app on your smartphone.)
For me, the TSA app’s most important feature is its up-to-date, real-time airport security time delay information for U.S. airports. You can use the app to make sure you allow yourself enough time to get through TSA security once you’re at the airport.
Give yourself adequate time to get your gate.
I have a neighbor who used to pride himself on never arriving at the airport more than an hour before his flight. Then, last year on I-76 East, he got caught in an accident and missed his flight. Now he’s at the airport at least two hours before his flight is scheduled to leave and will add more time to that if his TSA app shows extra time is needed to get to the airport and get through the TSA checkpoint. He also takes into account the time to park or return a rental car.
Pack carry-ons carefully, particularly any cables and cords for your electronic devices.
Packing carry-on poorly:
Particularly if you don’t have TSA PreCheck, you have to pull a number of items out of your carry-on, such as your liquid baggie, laptop, whatever you may need, etc. You want to be able to slip the items out quickly when you get to the checkpoint. Then, repack them with other electronic items in an accessible location. You put those in after inspection.
Most people pack lots of cords and cables in their carry-ons because we all seem to have more electronic devices with us than ever before. Loose or randomly packed cables and cords in a disorganized mess in your carry-on will often cause you to be pulled aside for secondary inspection.
A number of years ago, my carry-on was pulled for secondary inspection at Miami International Airport. The TSA officer there chatted with me as he carefully rummaged through my bag. The officer told me to roll the cords and cables and then use a cord keeper to make them into a neat package. He also told me to pack them all on the same level so they could be easily seen and didn’t block other items when my bag is x-rayed. He further suggested putting them all in a cable organizer bag. His suggestions would make it easy for the scanner program to accurately identify the cables on the screens watched by the TSA officer in charge of scanning the bags.
Have your travel documents ready to show at TSA checkpoints.
Not having your travel documents ready and handy:
If you’re unprepared to quickly show your documents to the TSA officer, they can get annoyed. You don’t want that. Keep your documents handy, including a government-issued photo ID, boarding pass, and, if traveling internationally, your passport. These days, boarding passes are usually on your smartphone, so have it ready to go, fully charged, with the boarding pass easy to retrieve.
 Secure personal items like your smartphone, keys, coins, etc. in a bin while you walk through the checkpoint. Have a place to stow the items. Wear a jacket with at least one zippered pocket or have a small bag ready to grab from your carry-on. Place it in a bin. Don’t put your photo ID or passport in a bin. Keep it on you.
These seven suggestions have gotten me quickly through TSA security checkpoints for years.
READ ALSO:
Disability pretenders are traveling again. Do they have a point?
Avoid death by selfie photography while traveling
After many years working in corporate America as a chemical engineer, executive and eventually CFO of a multinational manufacturer, Ned founded a tech consulting company and later restarted NSL Photography, his photography business. Before entering the corporate world, Ned worked as a Public Health Engineer for the Philadelphia Department of Public Health. As a well known corporate, travel and wildlife photographer, Ned travels the world writing about travel and photography, as well as running photography workshops, seminars and photowalks. Visit Ned’s Photography Blog and Galleries.